Merchant Manual
The Merchant Manual Documentation serves as a comprehensive guide tailored to empower merchants in effectively utilizing our platform. Covering a spectrum of topics, this manual offers detailed insights into account setup, payment processing, inventory management, and customer engagement strategies. Merchants will find user-friendly instructions complemented by illustrative examples to facilitate a smooth onboarding experience. The documentation dives into the intricacies of transaction handling, refund processes, and the utilization of promotional tools to maximize business growth. Additionally, it addresses common challenges, providing merchants with the knowledge needed to navigate potential hurdles seamlessly.
How to become a Merchant?
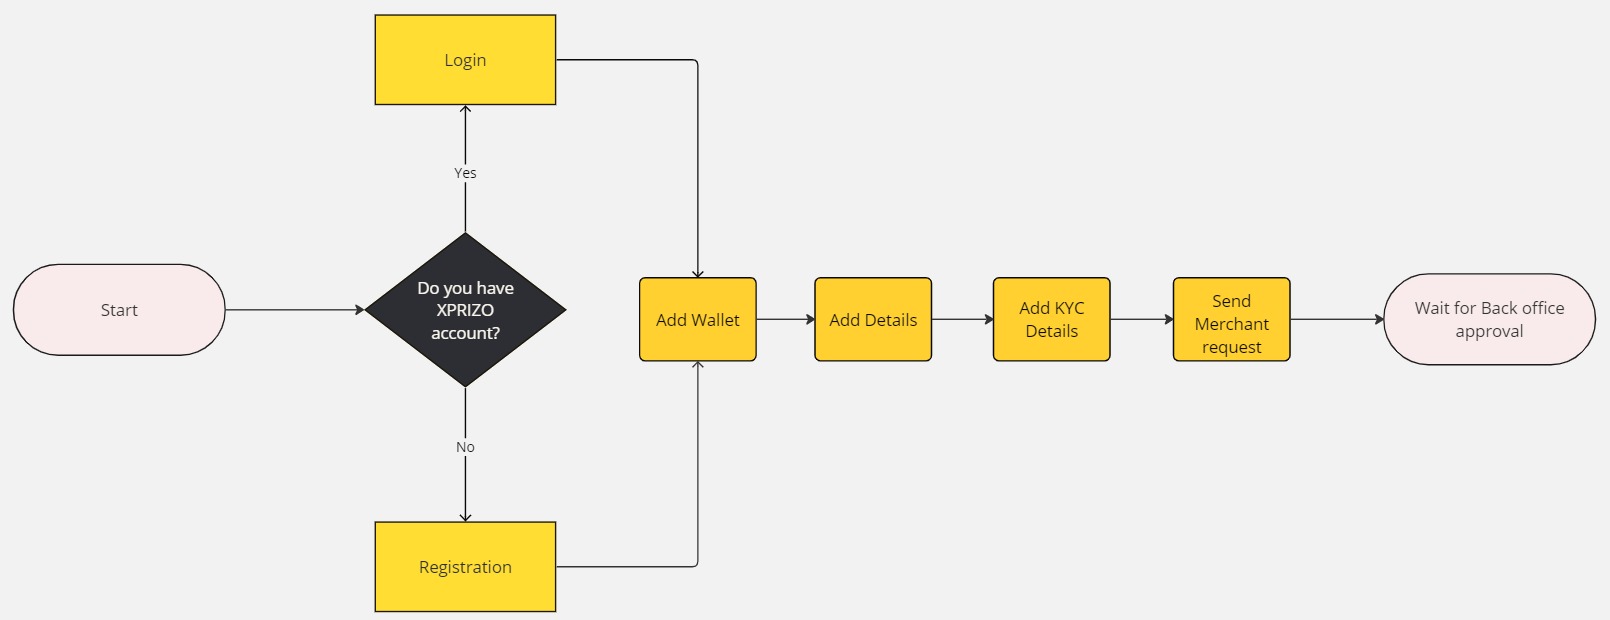
1. Login/Registration
- To initiate the creation of a new account, please click here and follow the provided steps.

2. Add Wallet
To be able to perform any kind of transaction or manage funds the user needs to add a wallet in their profile to execute various transactional activities. By adding a wallet user can store their funds securely and carry out transactions directly from their account. To add a wallet follow the steps outlined below.
3. Add User Details
To be able to send a merchant request to the back office, you will first need to complete user details for your profile. There you will need to complete your full name and address details. For a step-by-step guide, please click on the link below to learn how to add user details.
4. Add KYC Details
The next step is to complete KYC details and become KYC compliant. For this, you would have to upload your documents to verify your KYC. To initiate the KYC process, follow the provided steps below to complete the necessary procedures for KYC verification.
5. Send Merchant Request

- Click on the "Confirm" button to send the request.

-
After sending the request, the user must wait for approval from the back office. Upon approval, the user will become a Merchant.
How to do Integration?
Introduction
This document provides detailed steps for setting up your merchant profile, creating a processing profile with access to the merchant wallet, and navigating through testing (sandbox) and production (live) environments. Additionally, it walks you through the deposit process using a card/ Xprizo wallet/ Mpesa/ UPI, covering the flow, validation, callbacks, deposit transaction creation, approval webhook set up, and status checking. Follow the sections below to manage your account and transactions efficiently.
Account Setup
You need to create two profiles where the first profile will be of the Merchant having a wallet to be able to receive funds and the other profile will be of Processing which will be used for creating the transactions on the merchant's account wallet.
Merchant profile
To create a merchant profile use the below-mentioned link where you can find how to do registration, profile updation, KYC, and procedure for merchant requests.
Processor profile
A processor profile is required to manage the transactions of the merchant wallet. This processor profile will help the merchant, to secure his wallet by giving only the required access to the processor on the merchant profile. To configure the processor profile use the below-mentioned link where you can find all the steps to configure the processor profile (linking of merchant profile and processor profile, and after that how to give access to the processor profile of the merchant profile).
** You can also use a merchant profile as a processor profile, but this is advisable to have a separate processor profile to manage the transactions to make your main merchant profile secure.
Processor Profile Configuration
Test profile
To test the merchant account you will have to create a sample/test account which you will use to check if the integration is done properly or not.
Before starting the integration, the user needs to know about the available environment and authentication methods required for integration. Use the below-mentioned link where you can find details about the available environment, and authentication methods (how to generate token & API key and usage of these).
Deposits
Deposit Using Card
Flow

Steps
- Create Deposit Transaction Using Card
- Wait for a callback.
- Check status.
After you have called the Transaction/CardDeposit endpoint, a payment request is sent to the Acquirer network to process the card payment. A pending transaction is also created and Xprizo will continue monitoring the Acquirer network until an approval or rejection is received.
If the card is 'Approved' (2DS) then the transaction will be added to the merchant's wallet and the API will return an 'Active' status. No further action is required.
If there is a problem creating the transaction then the API will return a status of 'Rejected'.
It is possible that a card is not processed immediately such as some kind of delay or the user might need to approve the transaction using another device, then a 'Pending' status will be returned.
In the case of 3DS, there could be a redirect to an alternate URL. In this case, a 'Redirect' status and URL is returned.
The Merchant will get updates on the status of the transaction via callbacks. To receive a callback, you will need to request to set this up on your Merchant account (the profile that is used to create this transaction). This can be done by going to settings/preferences and setting the "Approval Webhook" to point to a URL of your choice. You can also set this using Preference/SetApprovalWebhook
A callback will be sent when
- The pending transaction is created.
- The pending transaction is approved
- The pending transaction is rejected
You can use this link to see the response coming on this Webhook.
** You should, however, check the status, after you get a callback to confirm that the transaction was completed successfully. You can use Transaction/Status endpoint to check the status.
Deposit Using Xprizo Wallet
To make a deposit, funds are transferred from a user's wallet to the merchant's wallet. This process is done by requesting a payment from the user through the Transaction/RequestPayment endpoint.
- Create a pending transaction on your system.
- Create and commit a payment transaction on Xprizo and wait for the response. Transaction/SendPayment
- If you receive an Ok Response (200), then the transaction was successfully processed and you can set your payment transaction as completed.
- If you receive one of the following error codes (400,401,403,500), then the transaction did not complete and you should cancel your transaction (or correct the problem and try again).
- If you do not receive a response from Xprizo or a timeout you will need to keep checking Xprizo until you can determine the status of the transaction. Transaction/Status
- Check transaction status
- Active - Approved
- Pending – Pending approval
- NotFound – Timed-out or cancelled
Create, Approve, Check
Use this method if the creation and approval of transactions are not done at the same time. For instance, the platform might initiate the transaction, and the merchant may approve the transaction
With this method, the platform needs to continuously poll Xprizo in case there's no immediate response from Xprizo to confirm whether the transaction was successfully created or not.
Flow
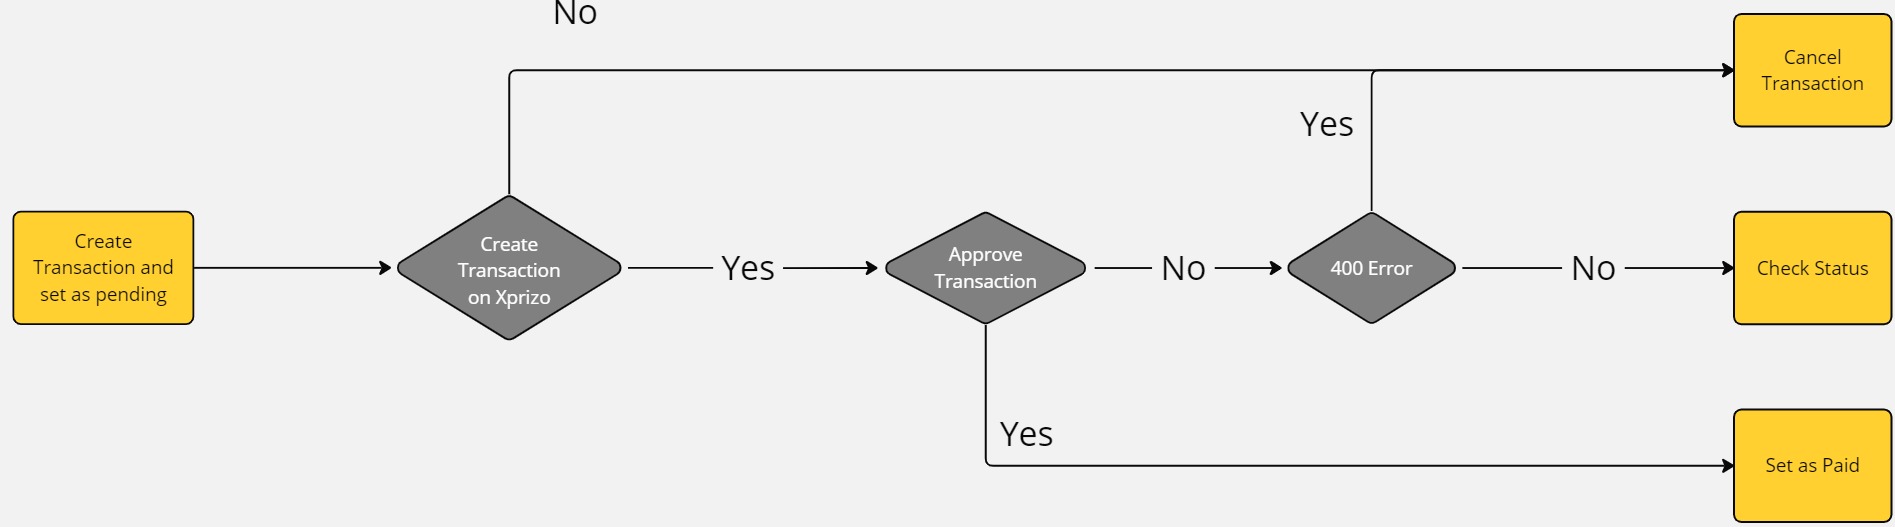
Steps
- Create a pending transaction on your system.
- Create a payment transaction on Xprizo and wait for the response. Transaction/SendPayment
- Use the key from the returned response to approve the transaction Transaction/Approval or wait for the merchant to approve the transaction (you can only approve the transaction if the merchant gave you full or approval rights to their wallet).
- If you are approving the transaction
- If you get an OK Response (200) then you should check the status of the transaction. Transaction/Status
- If you will wait for the merchant to approve the transaction
- and you have set the approval callback option in your settings Preference/SetApprovalWebhook then you will receive a callback once the transaction has been approved
- and you have NOT set the approval callback option then you will have to keep checking the status of the transaction until it is approved, rejected or expires. Transaction/Status
At any time you can cancel the transaction by calling Transaction/Cancel
Create, Hold, Check
Use this method if you prefer Xprizo to conduct the final check. Xprizo will verify that the transaction has been created on the platform by sending a callback and awaiting a valid response. Depending on the platform's response, Xprizo will either confirm the transaction or cancel it.
By using this method involves Xprizo initiating a transaction and placing it on hold. It will then send a callback to verify whether the platform has successfully updated the transaction on its end. If Xprizo receives a positive response, then the transaction will be completed. If a negative response is received or there is no response within 24 hours, the transaction is voided.
Flow

Steps
- Create a pending transaction on your system
- Create a payment transaction on Xprizo and wait for the response. Transaction/SendPayment
- Xprizo will create a transaction marked as ‘Hold’ and return 200 (success)
- If you get the 200 (success) response then leave your transaction as pending
- If the transaction failed with any error 400,401,403,500 excluding a timeout mark the transaction as rejected (Xprizo automatically deleted failed transactions)
- Xprizo will a send callback to the platform (make sure you have the "Payment Webhook" setup in Xprizo) Preference/SetApprovalWebhook.
- You should now set the transaction on your platform as paid and respond to the callback with 200 (success) response.
- It is recommended to check the status of the transaction on Xprizo to ensure that is completed Transaction/Status.
- Xprizo will keep sending callbacks until the platform responds
- If your platform does not response for 24 hours
- The transaction is voided
- Funds released back to the merchant
- If the platform responds with a success
- The Hold is removed and the transaction is marked as active
- If the platform responds with an error
- The transaction is voided
- Funds released back to the merchant
Withdrawal to Bank Accounts
When a user needs to transfer funds from their wallet to someone's bank account, they can easily initiate this process by providing the recipient's name, account number, and the desired amount to be transferred. This withdrawal method facilitates direct transfers to bank accounts, ensuring seamless transactions between users and their chosen recipients.
Flow
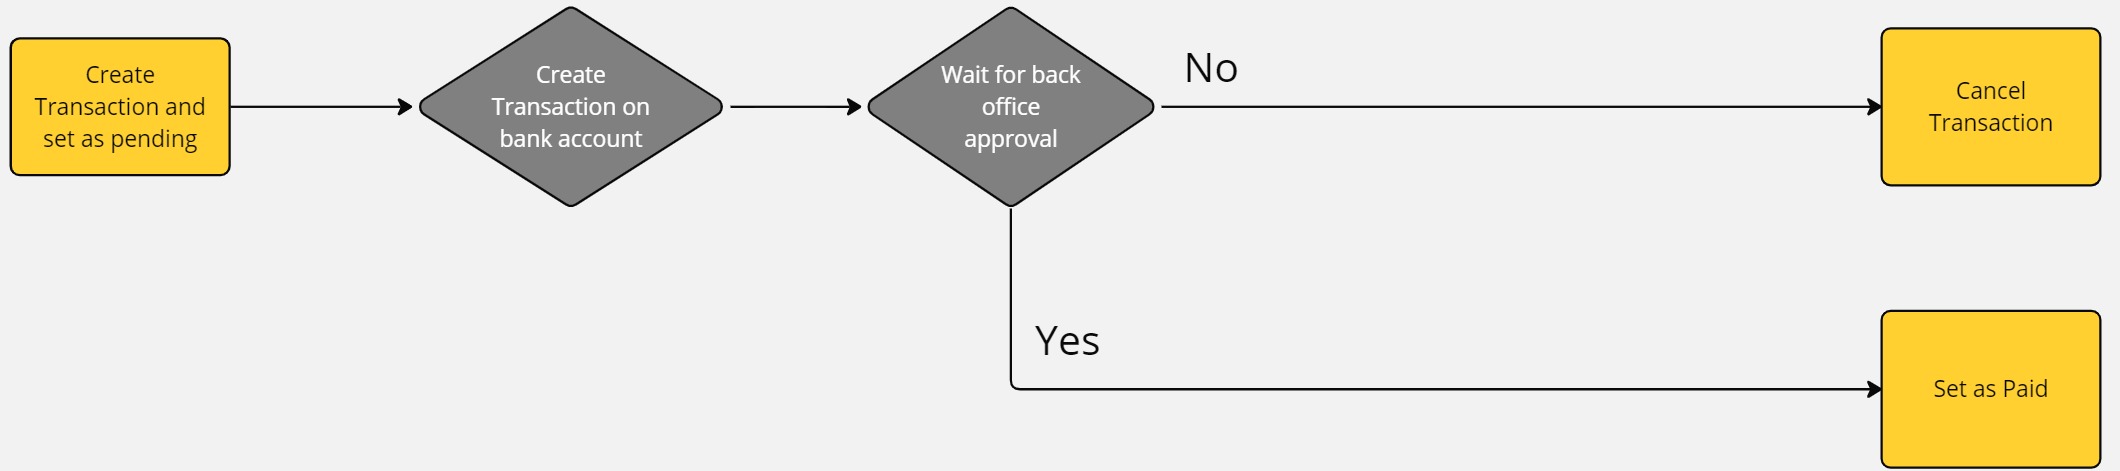
Steps
- Create a pending transaction on your system.
- Create a withdrawal request on Xprizo using this endpoint Transaction/BankWithdrawal
- After this the entered amount will be debited from your Xprizo wallet and the withdrawal will be created as a Hold transaction. This Hold transaction will be reviewed by the back office for approval.
- If the back office user
- approves of the transaction will go into the processing and after the successful processing this transaction will be marked as Active and the user will be notified using your approval webhook. You can configure your approval webhook using this Preference/SetApprovalWebhook.
- rejects the transaction the amount deducted will be reverted back to the user's wallet and the transaction will be marked as Void.
- and you have NOT set the approval callback option then you will have to keep checking the status of the transaction until it is approved, rejected, or expires. Transaction/Status
FAQs
1. How to Generate Payment Link
2. How to View Routing Codes
How to do Integration for Payment URL?
Introduction
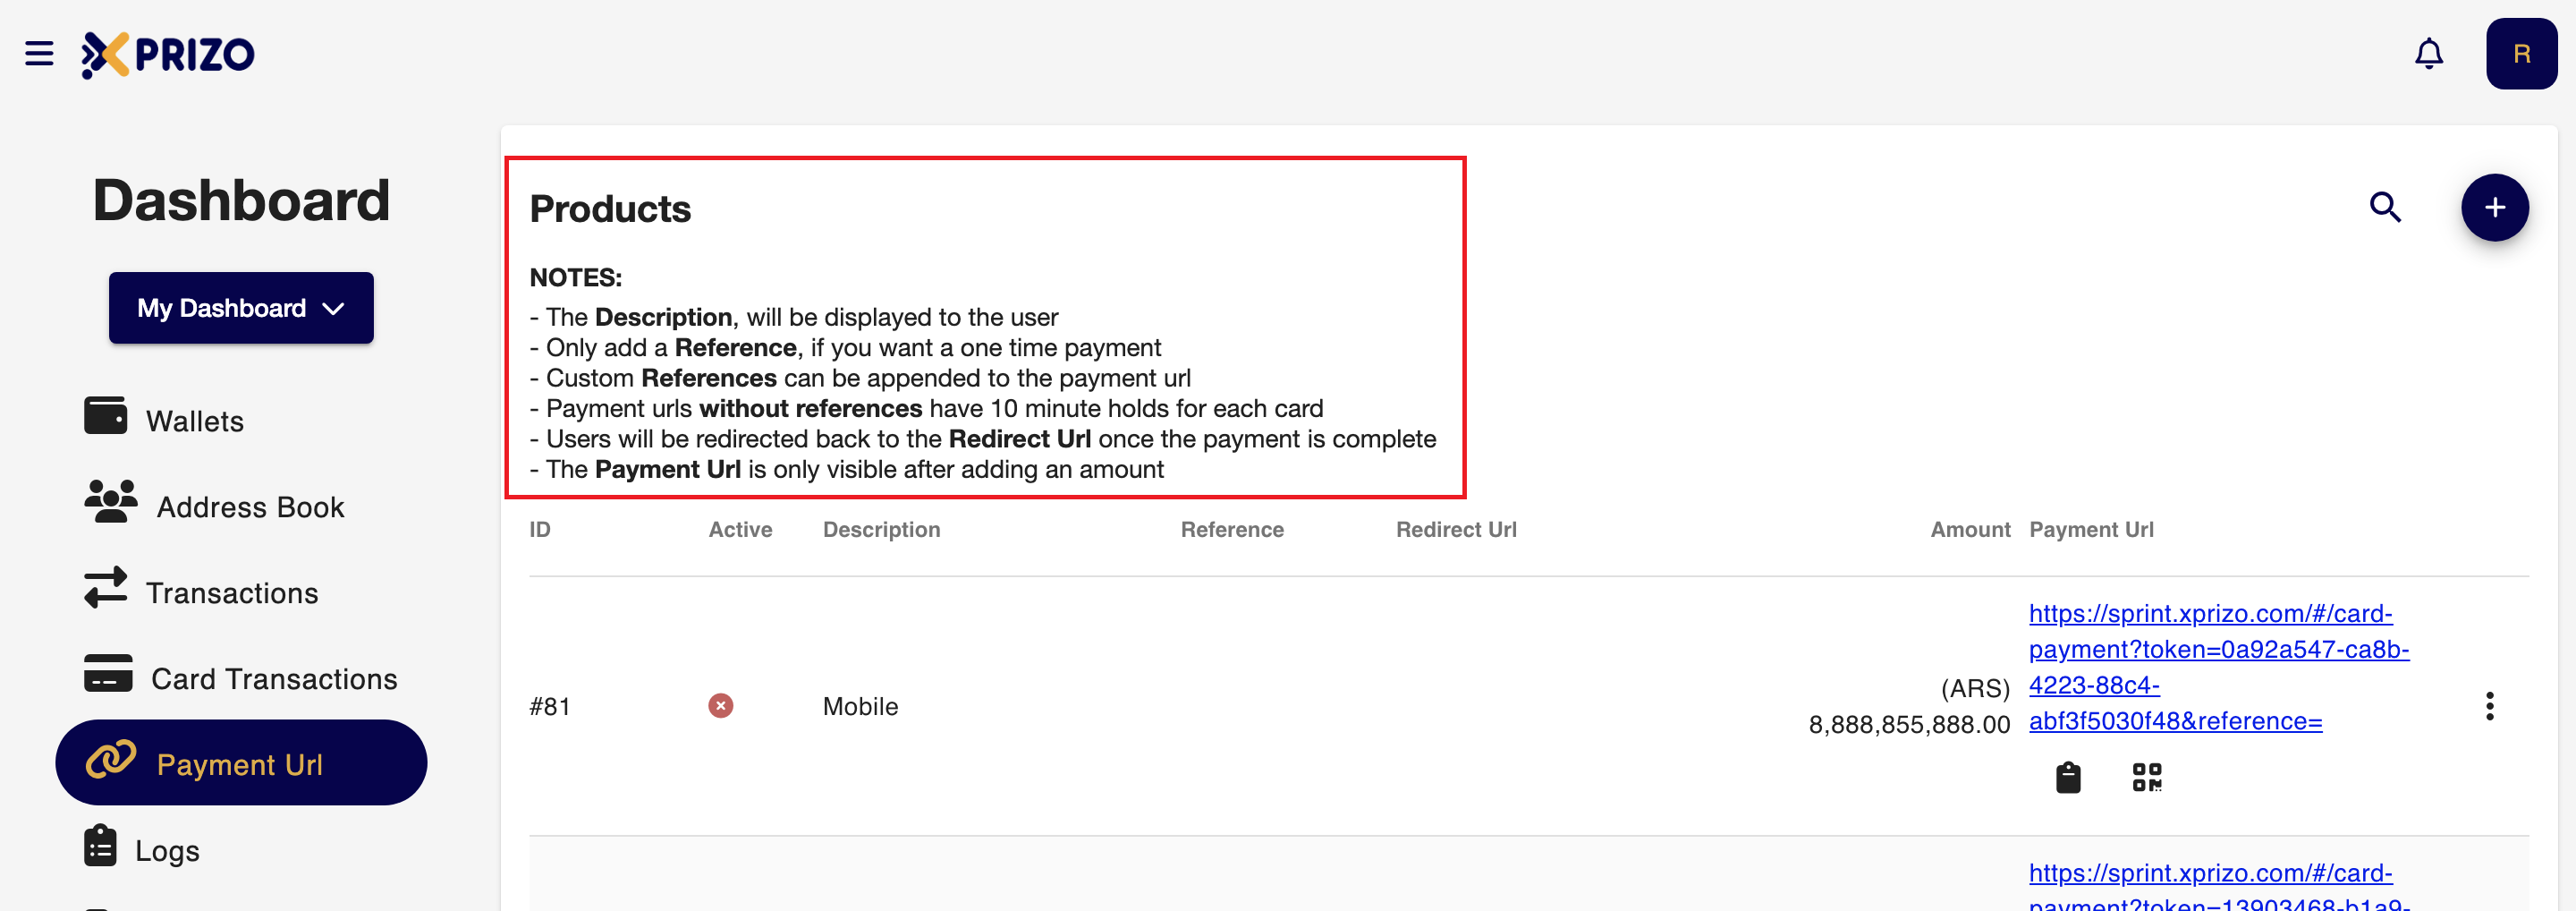
The Payment Link feature in Xprizo allows users to create a shareable payment link by entering the product amount. This link can be shared with both Xprizo and non-Xprizo users, enabling them to make payments via various cards. Additionally, a QR code is generated along with the link for easy transactions. When the link is shared with another user, the specified amount is directly added to that user's wallet, streamlining the payment process and ensuring funds are quickly and securely transferred.
How to create Payment URL?
Follow the steps written in the image below to be able to create the Payment URL.
To receive the notifications for the payment you've received through webhook then you can set this by navigating to the settings of your profile page this process will be done from the UI side, For reference click on the link below.
To perform the same process with the help of API click on the below link for the reference.